This year’s Musikmesse trade show is a topic for a separate post. For now, let us only mention the fact that the number of exhibitors from the drumming industry has been decreasing year by year, and those present set up rather modest displays this year. The GEWA company was no exception, but they compensated for that with their new and very interesting product – the GEWA G9 drum module. Naturally, BeatIt couldn’t have missed it. Here is our report from the electronic drums exhibition at GEWA/DW stand at Musikmesse 2018.
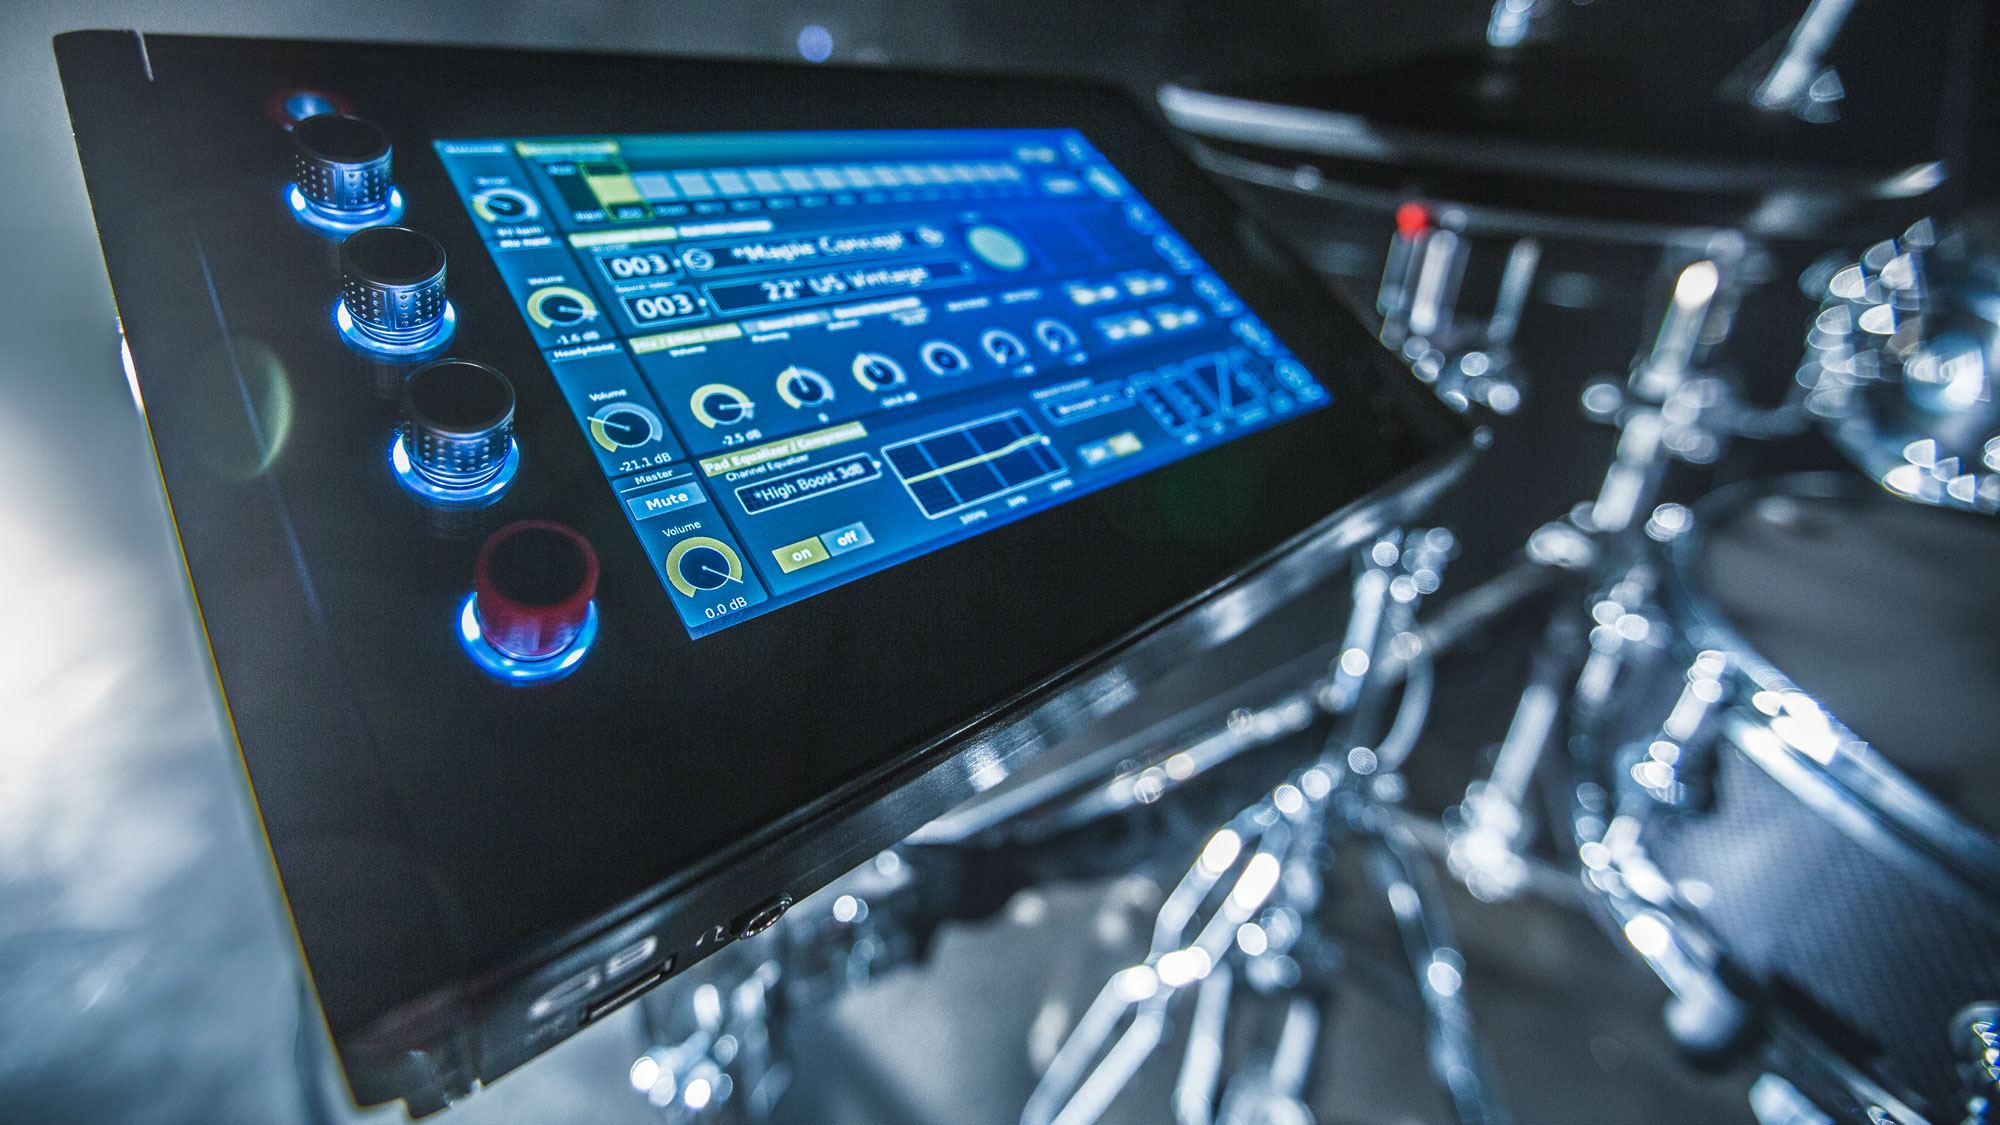
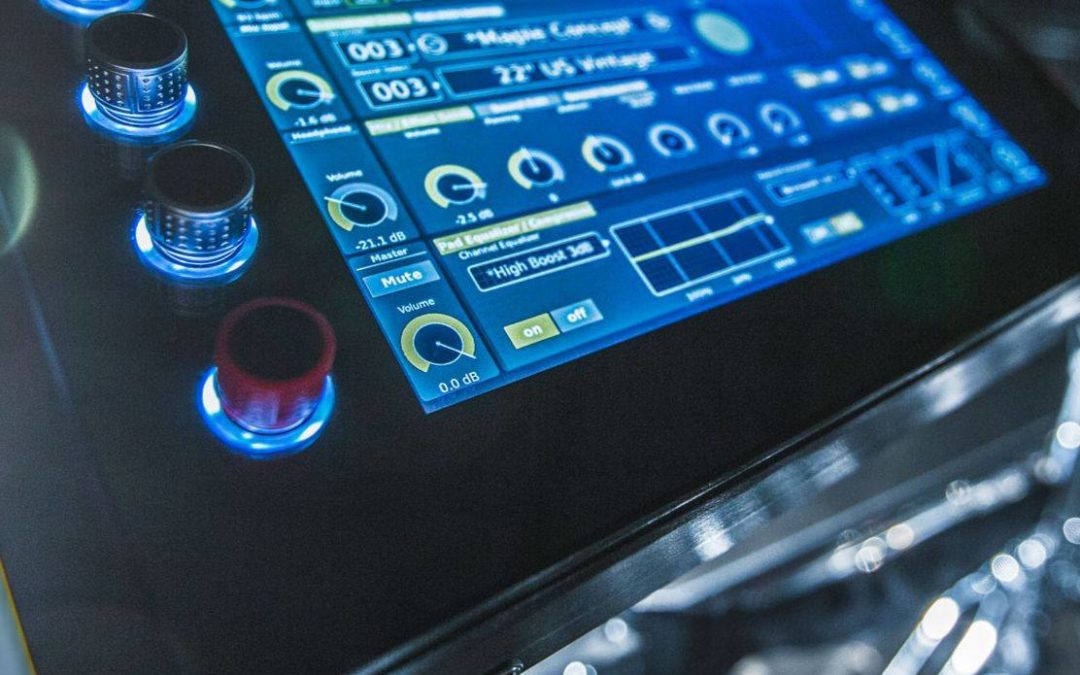
“This is the GEWA G9 drum module. It’s the flag ship we are presenting at the Frankfurt Musikmesse. It has a lot of features that go beyond what you know as digital drums.
It starts in performance mode, which is all you need for playing. Provided you have done all your adjustments, this is the place to pull everything you need. You can change your kit by swiping, just taping on it on the browser. Also, a number pad is available if you know what your favourite kit is. Then, you have capabilities of detecting when you do a rim shot or a rim click. If you choose X-Fade, you can set the thresholds when it turns from a rim click into a rim shot. If you play very hard, you’ll trigger a rim shot, and if you play soft, you’ll get a click. There is a mixer function with groupings so you can move all sliders at a time or individually. When you’re happy, you can move them all at a time.
Then, we have a song player, which allows you to play songs as you would do with a normal player. This is pretty basic. It’s driven by a browser. You have an internal drive to store files or your USB stick and your filters to select. When you’re playing, you can loop a certain section. Works with any mp3 or WAV file, so it just takes the snippets you want. You just press A and once again for B and then it loops the sections you have. Quick Record allows you to record yourself while playing with the song, with a click and everything. Then, it throws it on your USB stick and you can call it up as a Quick Record File. We have a plan to rename that file but for now it just gives you a quick record: one, two three. The cool feature is the Vary Speed. This function slows down and speeds up your song, but without changing the pitch. It just stretches the song and doesn’t go up or down in pitch. And, of course the volume. So that’s the song player.
Next, is the metronome. Also, various ways to access the speed. You have all these hardware dials for most important functions. You can change the dial here. Alternatively, you have a software dial with a slider. Or you can enter the tempo via number pad. You can also tap it. All you can imagine to set the speed is available. You can set the time signature and subdivisions. There are several sounds assignable to the metronome. A visual mode is available, so it lights up when you play with metronome. This is also movable. This is the only pop-up that does not close automatically. It’s a visual mode, so it doesn’t make sense if it closes because you want to see something. You have to close it manually. Next, we have metronome settings, so you can set the sound. You can also set the custom tap channel. You have the „Tap” button but you can also assign it to a component, e. g. the rim or the head of another pad. This is possible. You can set „Rim”, „Head”, both or none. All is possible.
When you want to go into detail and really change the sounds of your kit or create new kits out of the sounds available, you have the kit editor. You go into each individual pad to change the sound. You choose the pad you want to, keep „Auto Select” off. You can hit a drum and select the pad automatically, but it will probably drive you crazy after all. So keep it off, it’s better to do manually. Then, select the snare to start with. This is the currently active kit in performance mode. You can also change it here and then the sounds that you have assigned to the other kits change. To change a sound is very easy. You either tap on the field and open the browser, or hold down on the component you want to choose for one second. You also have this grouping function that’s always on the interface, which selects the group of samples that belong together. So if you record a Broadkaster snare, then you have a rim sound that was recorded from that snare, a cross stick sound from that snare and you have the CS sample for the head. CS stands for Center and Side. You have positional sensing available, i. e. you have samples from the side with more ring and more focused samples in the center. By default, it picks up the CS. You can also assign side samples only to the head. It doesn’t select everything, then it customizes that individual component. You assign this by double tapping and then the full sample set is assigned to the pad. The rim should also have a Collector’s Maple rim and the cross stick has a Collector’s cross stick. If you want to change it individually, like a tambourine sound, search „Percussion”, press an „Udu”. You have now assigned it to the cross stick in „Udu”.
This is more like a remote section for the effects and it’s beyond what you might know. The person who developed this is a sound engineer so there’s a whole recording studio inside this whole thing. This is more or less the remote control center for the effects section. We call it „instances” so you have the same button in several areas of the interface. This is an exact representation of switching in the effects mode. We’ll go to this in a second. Here, you can dial the global controls for effects. Note that you have a compressor and equalizer for each add and each channel. You can change this. Then, you have a different setting. Save it, and you see this pad has still the linear setting. This is absolutely customizable.
Next, is the effects mode. The switches you saw in the Kit Editor are located here and the volume dials are available here. Also you have effect sends. By default, also grouping functions available, so you can move everything. It works the same way as a regular mixer. This way, you can customize effects for each pad. The interesting part is, though it doesn’t look very interesting, is the first section. This is a section for room samples we have made at Funkhaus Studios in Berlin. They are stored or managed under this section. It’s a sample, cut the way it is, so there’s not much to adjust here. Three following sections we call modules. This is the mode – the main thing, and this is a module, built like a rack. The last three modules are more like generic ways of creating reverb: plates, rooms and so on. You can store all these in the middle section here as a preset. There’s a little bar separating these sections. Everything in the middle section is stored as a preset and then you have to save the kit because if all these effect sends are on or off in the kit, they will be stored like that in the kit. It will take the preset as a whole to store in the kit. It’s just a conceptual thing that might look very complicated but makes sense in the end from a studio perspective.
There’s also the multi effect: wah-wah, distortion, flanger, etc. The parameters you see change based on the effect. Trigger settings look similar to the kit editor bu t the difference is it doesn’t make sense to store trigger settings into a kit. It makes sense to store them to the drums you’re using, to the very pad and hardware. You have pads available, you can also create your own. We have some default presets for our hardware and drums, but also for other companies we were able to wrote presets from. That’s compatible and works with most pads on the market.
A neat little thing is you can change velocity curve as you desire. You have to choose „Custom”. The presets are not editable but your custom curves are so you can design the curve as you want to. Most of the time, it doesn’t make sense to go too concave. Convex is possible most of the time but if you really want to freak out. You can add another point and edit it with another point.
Trigger monitor. Trigger settings are available so you can manually dial what you want to. There will be a pad learn function for cymbals and drums to block out the highs and the lows within the range of the pad. General settings for the outputs. As you can see, you have a separate equalizer and compressor. Direct outs can be set as stereo audio or mono, so in the back you have eight individual outputs and you can bind them together to four stereo outputs or eight mono outputs.
Here’s the routing matrix. Now, a recording studio comes into play. Let’s say you’re in the studio and you don’t want to have the kick drum on the monitor for whatever reason. Switch it off. The monitor is now blocked, doesn’t go out there. More intuitive is probably routing others: you don’t want the click on the master out and the monitor but you do on the headphones. You can send any input and any output in this way. You can save everything as a preset so if you are in Studio A, this is set up that way and it’s what you need there. You save it and next time you’re there you can recall the preset. As I told you before, this matrix shows the mode. Whether the individual output is dual mono or stereo. I’ve switched this to stereo and it’s showing a matrix as a connection between two dots. It tells you these two outputs are bound together to stereo.
Presets again. It always works the same way. Equalizers and for any output, like „Monitor Out”, you have this equalizer function. You can also include foot switches so, if you want to change something by triggering a pedal, you can. Also, it is possible if you have a keyboard player in the band, you can communicate via MIDI. If he changes the sound for the next song, you can also remote control the workstation to change your drum kit.
There’s a whole MIDI section. The drum kit program goes far into studio. Then, you have „Auto Off” for displays or device. The last module says „Device”, which is a UI (User Interface) element, which you can change. You have an „Easy Startscreen” I’ll show you really quickly. If you press that red button, this is what you will see. Always good for the first contact. There’s the metronome, there’s the kit. It’s a simplified version of the performance mode. You can switch this off, which I’m doing now. Now, it is in this performance mode. Now, it’s general settings. You can set the timer to when it shuts down automatically. We have to do this for safety reasons, but it’s also very neat when you want to go out and keep it on. You can also set the brightness for the display and the knobs on the side. You can turn it off completely. So this is the UI stuff.
There’s a Wi-Fi function. You can connect to your local network to communicate with the GEWA cloud, so you can download sounds from there, do your updates, which I will show you later on. It’s very nice to have a smart phone or a player connected via Bluetooth and play a song from there. You then use the control of the other player. It also works very well if you don’t have a stick available or you want to play to a YouTube video. YouTube works very well in this case. Information that tells you what firm you’re using. This is not the final one, not version 1.0, nevertheless… That was general settings for global controls in the workstation.
We have the „Tools” section. It has an on-stage mode, PDF reader, an auto timeout import tool and a shop connection. Let’s start with the shop. When you’re connected via Wi-Fi, you have to do it in general settings, then you can simply connect. It says „Not connected” because we don’t have Wi-Fi at the booth so I can’t show you the shop. You hit „Connect”, it’s trying but does not work. In the shop, you have all the updates available and other information we want to give you, so you don’t have to go to the Internet or our website. If there’s an update that’s not working, you can check in your module right away. The sounds will also be there and there are more samples to select from. They will all be recorded in all these 100 layers per zone. „Per zone” means positional sensing. Each zone on the pad, from center to the side, will have its own 100 layers of velocity volume available. You can’t do this at home so it requires more advanced tools. These sounds will be available in the shop. Import tools, if you have your own WAV files, for example a triangle you like, you can import it and it will be available in the kit editor. It says „Import”. I have no file here but it shows you what you’ve imported and you can also assign it alternatively to what the workstation is equipped with.
PDF reader. If you want to do chart reading, it is possible. I have no USB so it should read automatically. You have the PDF filter. For the final version, it should be in default. You are in the PDF reader, you fire up the browser and it should select, only PDF files, of course. Then, you can have it on the screen. You can browse through the pages, so it’s just like on a regular PC or Mac. There’s all functions: you can turn it around, zoom – all you would expect is available.
And then we have the on-stage mode. It’s really good if you have sets and during the evening you’re changing the sounds for different songs. You don’t want to jump into the performance mode and select the kit manually. You need the metronome for that song and maybe a different speed and so on. To avoid adjusting this between the songs, you can simply call up if you have a preset. There’s always sets of 8. We could do more but the digits get smaller and on stage you want to have a large surface to tap on. You can edit the number, it turns red and tells you what you can include to this set. You can select a drum kit. We can do it right now. Metronome, maybe 20 – very slow, and then, if you need some backing tracks to it, you select them from a USB stick. Then, you save it, and when you go back to this preset, you have your sets available. So you can always program sheets of 8. If you need more, just start this preset.
That’s basically a quick overview. Maybe a little comment on the sounds. They use positional sensing so there’s one dimension more than you’re usually used to. The samples have the length they have to. Let’s say a ride cymbal rings for a certain amount of time. The sample is not cut after 10 seconds, we let it ring till you can’t hear it anymore. This takes up library space but in the end it results in a natural sound. You want to hear a long-ringing bell or something.”
Share

