Acoustic drums and cymbals are a very important, perhaps even the most important element of a drummer’s equipment. Not the only element, however. After all, there’s the increasingly popular electronic kits and drum modules. It was the latter type of gear that we have recently received from the Yamaha company. In such case, there was nothing else for us to do but take a closer look at all the functionalities and see if the Yamaha EAD 10 stands a chance of causing a stir in this segment of the market, which seems to be dominated by another Japanese manufacturer.

Yamaha EAD 10 Drum Module
1. The test
The test was carried out in our own recording facility. We also used a Yamaha Stage Custom kit with factory heads on (clear ones on the toms and the kick drum, a coated one on the snare), which was provided by Avant Drum Shop. In the course of our test, we will present all the effects and preset sounds the device is equipped with, as well as the module sound, the mic sound, the combination of both, reverb and effect levels, metronome functions, the way of recording drum parts, as well as the use of the trigger pedal.
2. Basic specification of the device tested:
- Manufacturer: Yamaha
- Model: EAD 10
- Device type: Drum module + trigger/mic sensor
- Dimensions: 260/138/63 mm (module), 76/78/88 mm (sensor)
- Weight: 654 g (module), 464 g (sensor)
- Record/playback: WAV (44.1 kHz, 16 bit, stereo)
- Memory: 32 MB
- Metronome: Yes
- USB: Yes
- MIDI: Yes
- Connector: 12V
- Kick drum trigger: Yes
- Microphone: Yes
- Connector cables: 2 pcs.
3. The product
EAD stands for Electronic Acoustic Drums and, as the name suggests, the device is designed as a tool enabling drummers to turn their acoustic kits into hybryd instruments. In short, one could say that the Yamaha EAD 10 allows the user to practice to his or her own backing tracks, record his or her performances (with or without the backing tracks) in good quality without the need to have a hole set of mics (videos can be recorded and edited via an iOS-compatible app), as well as share all that online. The configuration of the device is rather simple and troublefree. Connecting all the cables, operating the functionalities (level and effect adjustment, metronome), mounting the trigger on the kick drum hoop and the main unit on its holder is intuitive and clearly illustrated in the instruction manual.

What functionalities does the Yamaha EAD 10 drum module offer and how to operate all of them? In order to avoid writing an instruction manual from scratch (after all, it is supplied by the manufacturer), let us list and characterize them briefly:
- Overall volume adjustment (MASTER knob) as well as AUX IN volume adjustment and click functions (AUX/CLICK knob)
- 50 preset drum kit sounds (SCENE, from acoustic to electronic ones) which combine reverb, effects (distortion, wah-wah, compressor, phaser, flanger) and instrument samples such as kick drum, snare, cowbell, tambourine, cymbal and other instruments. The SCENE knob switches preset types while the REVERB knob adjusts the volume of reverb, the EFFECT knob adjusts the volume of effects and TRIGGER adjusts the volume of the trigger sound.
- Mic volume adjustment
- Automatic sensor unit gain setting (trigger versus mic)
- 11 reverb types
- 31 effects (21 for the mic, 10 for the trigger)
- 757 samples (voices)
- Creating user scenes by changing reverb type (F1 button), effect type (F2) and trigger sounds (F3) followed by the [-] i [+] buttons. Saving user scenes happens by pushing the STORE button. They can be given new names.
- Advanced trigger sound settings, which are needed when using the Yamaha DT50S snare drum trigger (trigger not included), Yamaha DTX TP70S, XP80 and PCY135 pads (supports three-zone pads, not included either), as well as a foot switch (we used a Yamaha HH65). We did take some time to try this option out. In each of the cases, the main unit must be switched off, the devices connected (SNARE 3, SNARE 4, 5, 6 and FOOT SW sockets respectively), switch on the main unit and press the MENU button to choose a device. Assigning trigger sounds is done by the F3 (trigger) button. It triggers off the following on the display: pad names, instrument categories (e. g. bass drum), as well as trigger sound name and number. The F1 button gives access to them, while the [-] and [+] buttons allow them to be changed. Auditioning is possible when pressing the F2 button.
- Using imported sounds in the form of (.vaw) files
- Metronome: includes tempos from 30 to 300 b.p.m., the tap tempo function, allows the user to play in such time signatures as 1/4 to 16/4, 1/8 to 16/8 and 1/16 to 16/16 with accents, quarter notes, eighth notes, sixteenth notes, and eighth-note triplets. To access the metronome functions, press the click button (metronome icon). Then, the F1 button starts and stops the click, the F2 sets click volumes and types of sounds, while the F3 allows for tapping the tempo.
- Recording user performances to the module. This function is accessed with the RECORDER button, the F1 button starts and stops recording and the F2 functions as “Play” and “Stop” when playing the recording back. No USB flash drive may be connected to the main unit.
- Recording user performances to a USB flash drive or an external player/smart phone (AUX IN). This function is accessed with the RECORDER button, the F1 button starts and stops recording and the F2 functions as “Play” and “Stop” when playing the recording back, and the F3 allows source change and recording to an external device (AUX IN).
- Overdubbing user performances being recorded to accompaniment. Import an accompaniment track in the form of a (.wav) file from a USB flash drive (the TO DEVICE USB port, requirements: 16-bit, 44.1 kHz, stereo, wav format) or from an external device (AUX IN). Next, press the RECORDER button and then the F3 to select the source (USB or AUX IN). The F1 button starts and stops recording and the F3 saves the accompaniment file. The [-] and [+] buttons select an accompaniment track before recording a drum performance, the F1 together with the F2 starts the recording while the F2 stops it and functions as “Play” and “Stop” when playing the recording back. Recording is also possible with iOS (iPhone, iPad), as well as onto a computer with DAW software.
- Access to advanced settings on the display (MENU button).
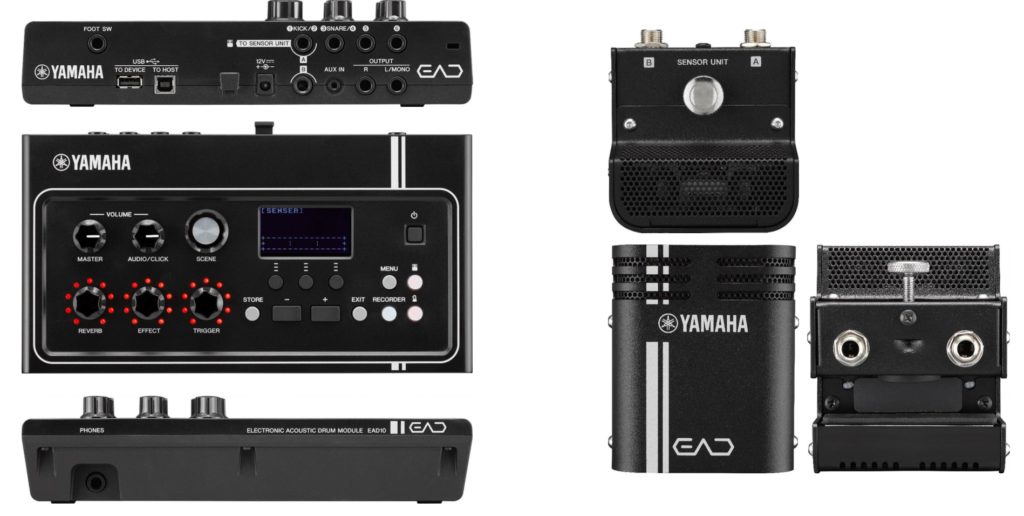
Rear panel (see: photo above) functions:
- Foot switch socket (FOOT SW)
- TO DEVICE USB port (for a USB flash device)
- TO HOST USB port
- AC adaptor socket
- KICK 1 and KICK 2 mono sockets (A i B) connect to the sensor unit
- SNARE 3 i SNARE 4 mono sockets connect the DT50S trigger (trigger not included)
- sockets 5 and 6 for Yamaha DXT pads: TP70S, XP80, PCY 135 (support three-zone pads)
- AUX IN socket for an external music player or smart phone
- L/R output mono sockets for a PA system
Front panel (see: photo above) functions:
- standard stereo phone socket (6,3 mm)
Sensor unit functions (see: photo above):
- Mic sensor (captures the drum kit’s acoustic sound and converts it into an audio signal)
- Socket A (sends trigger sensor signal) and socket B (sends mic sensor signal) connecting sensor unit to KICK 1 and KICK 2 mono sockets
- Clamp screw (secures sensor unit to bass drum hoop)
- Trigger sensor (converts bass drum vibrations into trigger signal)
It is worth mentioning that the microphone makes it possible to put effects on the entire acoustic kit, including cymbals, which could bring very interesting results live. The mic should theoretically replace miking our kit on stage, however, we didn’t have an opportunity to check that option “in the field”. The same goes for the iOS-compatible app for shooting, editing and sharing videos on-line. Especially the latter seems like an interesting subject for a separate BeatIt test, which we plan to carry out.
4. Summary
Yamaha EAD 10 is a perfect device for musicians who do not have expert knowledge on how to record drums professionally but would like to record a demo with live drums having no expensive compressors, mics or a proper live room. The module makes creating a decent-quality demo, a drum cam or file exchange fairly easy. The user can count on some good, semi-professional sonic results. The EAD 10 is also an answer to the prayers of those drummers who play with an in-ear monitor system because they are no longer forced to buy a set of mics, stands and a mixer, which are all rather costly.
Advantages:
- Recording the user’s drum performances and playing them back
- Overdubbing the user’s drum performances onto accompaniment songs (audio files)
- Video recording and editing (iOS)
- Hybrid drum kit effect
- Saving on mics, mixer, compressors, triggers, stands
Disadvantages:
- None
Drummers and Drummerettes! It’s time to put the Yamaha EAD 10 drum module to our test, exclusively for en.beatit.tv viewers!
Share


